






How to Take Skin Photos for Your Consultation
This article is educational and does not diagnose a condition or replace care from a qualified medical professional.
Clear, well-lit skin photos are one of the most important parts of your online consultation with us, because they let Dr. Maria "see" your skin almost as clearly as she would in person and design a precise, personalized treatment plan. If you have been wondering how to take skin photos for consultation, the reassuring answer is that a regular smartphone is enough when you understand what your images must show and how to capture them. Whether your concern is acne, rosacea, pigmentation, sensitive skin, or early signs of aging, a handful of thoughtful photos can make remote care feel remarkably close to a traditional dermatology visit.
Table of contents
What your photos actually need to show
For a remote consultation, the goal is not simply to "show the problem" but to document it in a way that is clinically useful. Good dermatology photos generally answer four questions, and keeping them in mind changes how you frame each shot.
The first is location and spread. Overview or context images help Dr. Maria understand how acne, redness, or pigment changes are distributed across your face or body, which often carries diagnostic meaning on its own. The second is appearance up close: mid-range and close-up photos reveal whether acne is inflamed or non-inflamed, expose the vascular patterns typical of rosacea, define the borders of pigment spots, and show fine lines or texture change.
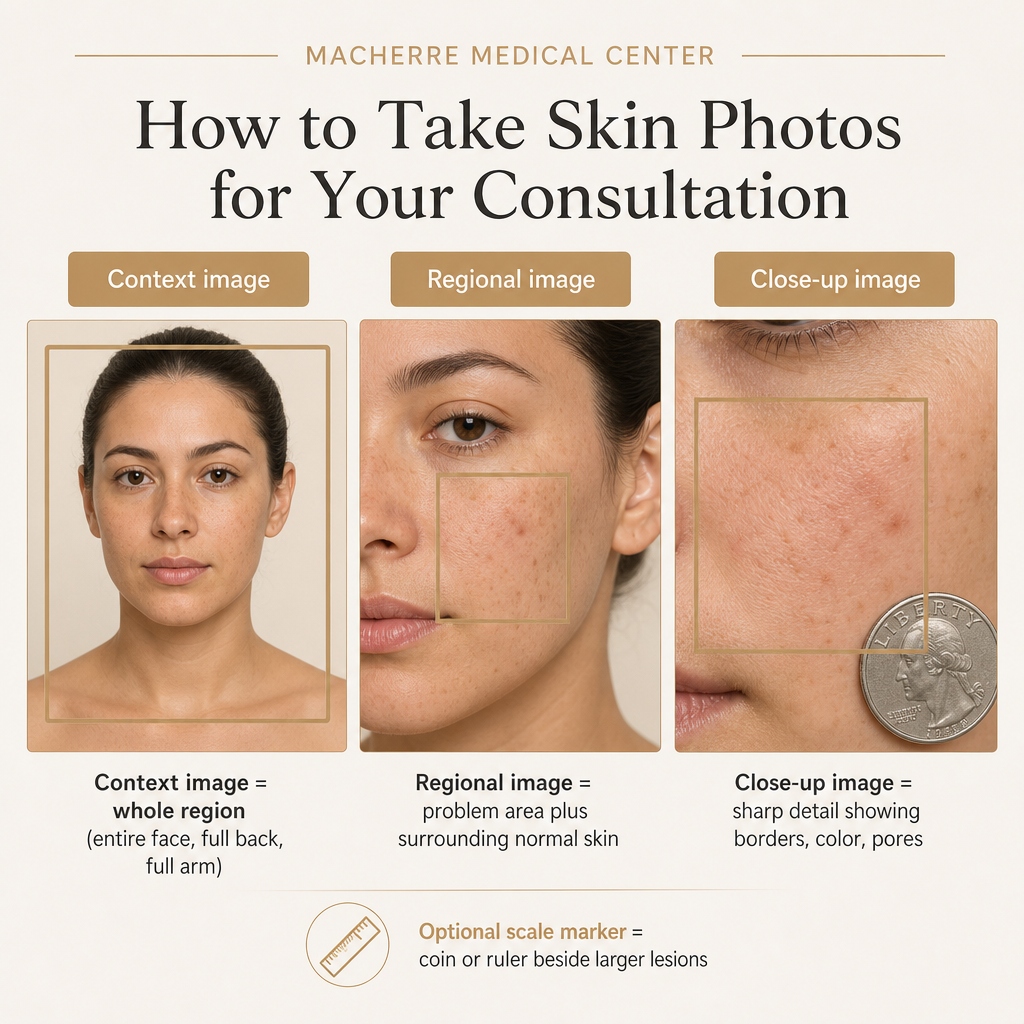
The third question is size. Placing a simple scale marker such as a coin or ruler beside a lesion, without covering it, lets your specialist judge dimensions and later track progress. The fourth is behavior over time. When it is relevant, dated photos taken across days or weeks show whether lesions are spreading, fading, or responding to a plan, which matters especially for chronic acne and evolving pigmentation.
These images never stand alone. We combine them with your detailed intake form, so Dr. Maria sees both the visible changes on your skin and the story behind them: hormonal shifts, triggers, previous treatments, and lifestyle. That pairing is what makes remote care clinically robust rather than photo-based guesswork.
How skin photos work in an online consultation
Teledermatology and online cosmetology rely on standardized image sets, so that each photo can be interpreted consistently. In practice, your photos are captured, uploaded securely, and reviewed alongside your medical history, symptoms, and current skincare routine.
A combination of overview, regional, and close-up images allows pattern recognition and lesion analysis similar to an in-office exam. From these, a specialist assesses the type of lesions present, such as papules, pustules, nodules, and comedones, along with redness patterns, distribution, and the subtle color differences essential for identifying acne types, rosacea subtypes, and pigment disorders. For dynamic conditions like flushing in rosacea or evolving post-acne marks, a series of images across time can clarify whether you need more intensive care, program-based follow-up, or simple reassurance.
Every remote system has limits. Some skin cancers and very complex rashes still require in-person examination and possibly a biopsy. Teledermatology guidance is consistent on this point: clear photos improve diagnostic accuracy, but they do not replace urgent care when a lesion is rapidly changing, bleeding, or accompanied by systemic symptoms such as fever or unexplained weight loss. Knowing that boundary is part of using photos responsibly.
Preparing your skin and your surroundings
What you do in the few minutes before shooting has a direct effect on accuracy. Preparation falls into three areas, and skipping any one of them tends to distort your baseline skin.
Start with the skin surface. Remove makeup, tinted sunscreen, and colored BB or CC creams from the areas you will photograph, since these can mask redness, bumps, and the borders of pigment. Avoid applying new skincare products right before shooting, because creams and oils create shine and glare or a temporary shift in redness that misrepresents how your skin normally looks. And never use filters or beauty modes; even slight alterations in color or texture interfere with assessment.
Lighting is the second area. Bright, even light is what you want, and natural daylight near a window is ideal because it renders true color without a strong yellow or blue tint. Avoid harsh shadows and spotlights: strong overhead light exaggerates wrinkles and uneven texture, while side shadows can hide lesions entirely. If you must rely on indoor lighting, make sure the space is well lit and steer clear of colored lamps or LED strips that cast a tint.
The third area is your background and anything distracting. Sit or stand in front of a plain, neutral wall or solid fabric, because busy patterns confuse the camera's exposure and make lesions harder to see. Remove jewelry, scarves, or anything covering the area of interest. For facial concerns, tie back your hair and take off glasses where possible, unless the frames themselves are part of the issue, such as pressure marks on the skin. Prepared this way, your photos reflect the real condition of your skin rather than temporary changes created by cosmetics, lighting, or camera effects.
Camera settings, angles, and distance
You do not need a professional camera. Modern smartphones are more than sufficient when used correctly, and consistency matters far more than expensive equipment.
Begin with the basics of capture. Use the highest resolution your camera allows and avoid compressed or low-quality modes, which blur fine detail such as comedones and small pigment spots. Clean the lens first, because a fingerprint alone can produce a hazy image that hides subtle texture and color. Tap to focus on the area of concern, then confirm you can see skin features like pores, hair follicles, and fine lines when you zoom in.
For angles, teledermatology consensus recommends three types of images for each area. A context image shows the whole region, such as the entire face, the full back, or a complete arm, so distribution and symmetry are visible. A regional image is a closer shot of the problem area that still includes surrounding normal skin for comparison, which is important when contrasting pigment spots against your baseline tone. A close-up image is taken as near as you can while staying in sharp focus, revealing borders, color variation, and surface features like scaling, crusts, or pores. For facial acne or rosacea, guidelines often add front, right, and left views, plus shots of the chin and neck with the head tilted back, to fully document distribution and severity.
A few habits keep these images undistorted. Hold the camera perpendicular to the skin, straight on rather than angled, to avoid warping. Keep the area of concern centered and include a little surrounding normal skin. Watch the preview for your own shadow falling across the skin, and shift position or angle until it disappears. For larger lesions or patches, place a ruler or coin nearby without covering them so size can be judged. If you are documenting several areas, label your files or add notes such as "left cheek," "right cheek," or "upper back" so nothing is confused later. These small techniques turn casual snapshots into images that can be reliably read in a remote setting.
Tailoring your photos to your main concern
Most of our consultations focus on chronic or hormonal acne, rosacea, pigment issues, sensitive skin, and early signs of aging. Photographing with your specific concern in mind makes the whole consultation sharper.
For acne and chronic breakouts, capture full-face images from the front, left, and right, plus close-ups of lesion clusters on the cheeks, chin, jawline, and forehead. If breakouts extend to the neck or back, include both context and close-up photos there, since distribution can hint at hormonal versus mechanical triggers. Document inflamed lesions that are red and painful as well as non-inflamed ones such as blackheads and whiteheads, because treatment choices differ between them.
For rosacea and facial redness, photograph when the redness is actually visible, whether at baseline or during a typical flush after heat exposure, so vascular patterns and distribution come through. Add close-ups of areas with visible vessels, small bumps, or eye involvement, all of which influence subtype and care within rosacea management.
For pigmentation, age spots, and post-acne marks, use the most neutral lighting you can and avoid color casts that change the perceived shade. Capture both context and close-ups of key spots so that clear borders and color gradation are visible, and include a scale marker for larger patches so they can be tracked over time. This detail supports post-acne and discoloration treatment as well as age spots and hyperpigmentation care.
For sensitive skin, photograph flare-ups with close-ups of redness, scaling, or micro-irritations around the nose, mouth, and eyes, which helps guide sensitive skin care. For early aging, focus carefully on fine lines, texture change, and areas of laxity, using soft but bright light so these features show without exaggeration.
When your photos are good enough, and when to redo them
A simple checklist tells you whether your images are ready to submit, drawn from established dermatology photo guidance.
Your photos are likely sufficient when each problem area has at least one context, one regional, and one close-up image; when the skin appears in natural or neutral light without harsh shadows or strong tints; when lesions are in focus so pores, lines, and borders are clear on zoom; when no filter, beauty mode, or heavy makeup obscures the skin; and when size and location are obvious because landmarks are visible and a scale marker sits beside larger lesions.
Retake photos when an image is blurry or grainy on zoom, when the light is so dim or tinted that redness, pigment, or texture looks unlike reality, when the frame is so crowded with spots that no normal skin remains for comparison, or when jewelry, hair, or clothing covers a key area.
Separately, consider an in-person evaluation locally, and not necessarily through us, if you have a rapidly changing, bleeding, or ulcerated lesion that looks suspicious or comes with significant pain, fever, or other systemic symptoms, or if a previously assessed lesion has changed dramatically in color, shape, or size over a short period. High-quality photos improve remote diagnostic accuracy, but urgent or complex cases can need hands-on examination and procedures that simply cannot be performed online.
How we use your photos at Macherre
We are built specifically as a remote-first skincare clinic: you complete a detailed form, upload your skin photos, and receive a personalized plan that brings together nutrition, topical skincare, and lifestyle changes. Your images let Dr. Maria classify your acne type and severity, distinguish rosacea from other causes of redness, and characterize pigment patterns. They also help her identify contributing factors such as mechanical irritation, incorrect product use, or photoaging, and they make it possible to monitor progress over time.
That last point matters most inside structured care. In our ProAcne Program, bi-weekly follow-ups run over a three-to-four-month course, and consistent photo documentation is what makes those check-ins meaningful. The same approach supports our work on acne treatment, texture concerns, dehydrated skin, and the other areas we cover, all without asking you to visit a physical clinic. When your photos are clear, your remote consultation feels much closer to a traditional dermatology visit while still respecting your time, privacy, and location.
Frequently asked questions
Do I need a professional camera?
No. A modern smartphone with a clean lens, good lighting, and high-resolution settings is enough for dermatology-quality photos.
How many photos should I send per area?
Aim for at least three per area: one showing the full region, one at medium distance, and one close-up in sharp focus.
Should I wear makeup or tinted sunscreen?
No. Remove makeup and tinted products from the areas you are photographing so lesions, redness, and pigment stay clearly visible.
Can I use filters or beauty mode?
No. Filters and smoothing modes alter color and texture, which can mislead the clinical assessment.
Are there situations where online photos are not enough?
Yes. Rapidly changing, bleeding, or ulcerated lesions, or rashes with systemic symptoms, may need urgent in-person evaluation despite teledermatology options.