





How To Prepare For An Online Skin Consultation
This article is educational and does not diagnose a condition or replace care from a qualified medical professional.
A well-prepared online skin consultation lets your specialist read your skin almost as accurately as an in-person visit, so you leave your first appointment with a clear diagnosis and a realistic plan instead of more guesswork. Knowing how to prepare for an online skin consultation takes only about 20 to 40 minutes of focused work, and at Macherre Medical Center our consultations start from around $49 | €42. That short preparation window is where most of the value is won or lost: sharp photos, an honest history, and a simplified routine give Dr. Maria the raw material to design a plan that actually fits your skin.
Table of contents
What to expect from your online visit with us
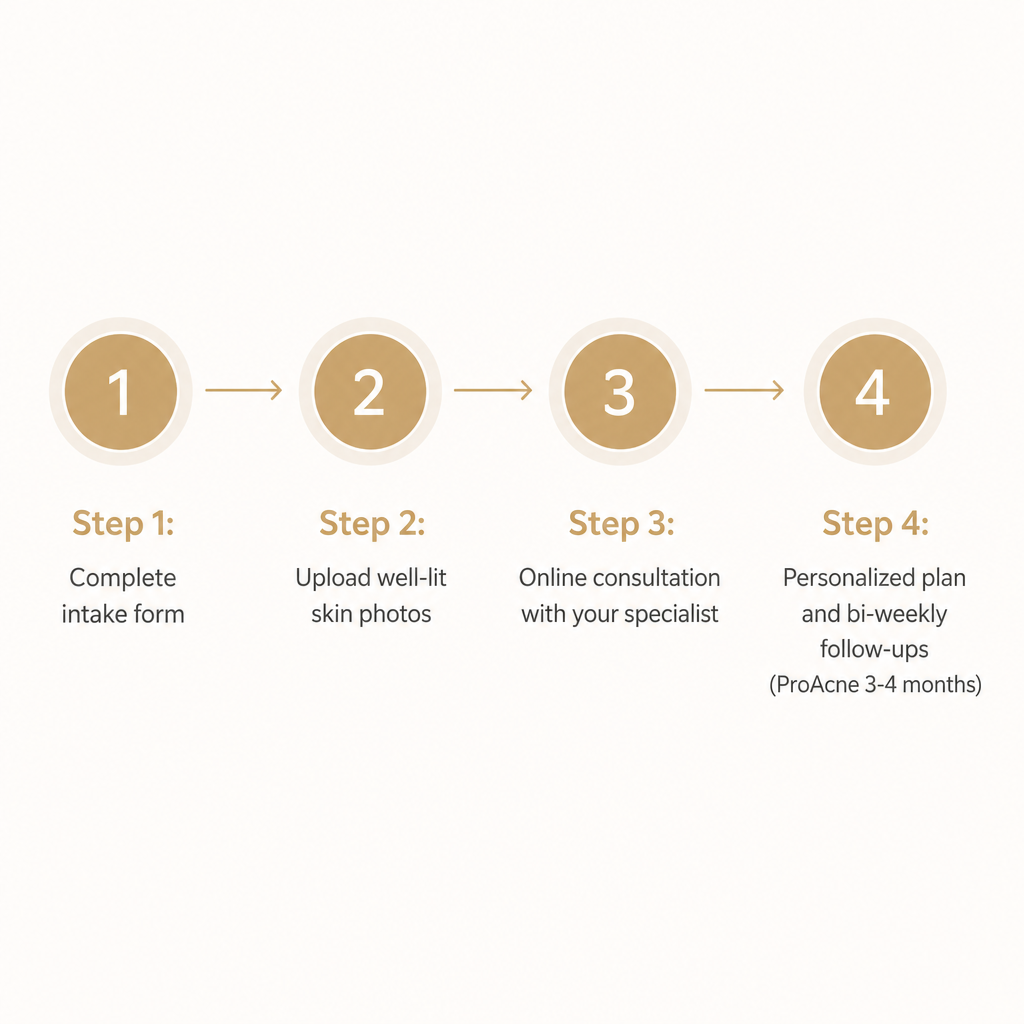
We work in a remote-first model: you complete an intake form, upload photos of your skin, and then meet your specialist online to receive a personalized plan covering skincare, nutrition, and lifestyle changes tailored to your condition. That structure shapes how you should prepare, because the form and photos do much of the diagnostic work before the call even begins. If you already want a deeper picture of the sequence, our overview of how our online consultations really work walks through each stage.
An online visit fits especially well if you have chronic or hormonal acne, rosacea, or pigmentation and want ongoing expert supervision, if over-the-counter products have repeatedly disappointed you, if you prefer a topical-first or non-medication approach where appropriate, or if you want a Russian- or English-speaking specialist without traveling. For persistent acne specifically, our acne treatment consultation is built around identifying the underlying cause rather than chasing symptoms, and our signature ProAcne Program adds bi-weekly follow-ups over a 3-4 month course, which is a realistic window to see stable improvement.
Your pre-visit checklist
Gather these items before your appointment so nothing slows down the call. Each row addresses a question your specialist will otherwise have to spend consultation time asking.
| What to prepare | Details that matter |
|---|---|
| Concern and history | Main skin concern, how long it has lasted, and any past conditions or procedures such as peels, laser, or isotretinoin |
| Medical background | Current diagnoses like PCOS, thyroid issues, or allergies |
| Medications and supplements | Prescription drugs, over-the-counter treatments, vitamins and supplements, with doses and duration |
| Skincare line-up | Every product you use, how often, and how your skin reacts to each |
| Lifestyle and hormonal notes | Cycle patterns, pregnancy or breastfeeding, sleep, stress, diet, smoking or alcohol, occupational factors |
| Photos | Clear, well-lit images at different distances with a neutral background |
| Technical setup | Stable internet, working camera and microphone, quiet and private room with good light |
| Admin | ID, payment method, and any previous lab results or dermatologist letters |
When you note medications and supplements, record doses and how long you have taken them, since timing often explains why skin improved or worsened. For products, note any recent change that coincided with a flare, because that link is easy to spot in hindsight and easy to forget on the call.
Step-by-step: preparing for the consultation
Step 1: Define your main goal
Decide what you most want to achieve over the next 3-4 months, then narrow it to one or two priorities: clearing active acne and preventing new breakouts, fading post-acne marks and pigmentation, reducing rosacea redness and flares, calming reactive skin, or softening early fine lines. Write down how your skin currently affects daily life, whether that is pain, self-confidence, or dependence on makeup. This helps your specialist decide, for example, whether to open with intensive acne control or with targeted post-acne and discoloration treatment in the first phase.
Step 2: Fill out the intake form thoroughly
The form is the backbone of a remote consultation. Answer every question, even ones that feel only loosely related, such as digestion, sleep, and stress, because these often connect to skin patterns. Be specific about when your problem started, whether it is constant or comes in flares, what seems to trigger it, and which past treatments helped or worsened your skin. If you are genuinely unsure of a detail, write "unsure" rather than an approximate number that could mislead your plan.
Step 3: Prepare your skincare and medication line-up
Place all current products on a table, including the ones you use only sometimes, like masks and spot treatments. Keep prescription tubes, pills, and supplement bottles nearby, or photograph their labels. Note the frequency of each product and any redness, burning, or breakouts linked to it. Many treatment failures happen because a seemingly harmless product, such as a harsh scrub or a fragrance-heavy cream, quietly keeps irritating the skin; having everything visible helps your specialist spot the pattern quickly.
Step 4: Take clinic-quality photos
Good photos let a remote specialist assess severity, pattern, and subtle color changes almost as well as face-to-face.
- Lighting and background: Use bright but indirect daylight near a window or diffuse indoor light. Avoid harsh overhead lights and deep shadows. Stand in front of a plain, light-colored wall or door.
- Camera and framing: Clean the lens, then take one wide photo of the whole area, one mid photo including a recognizable landmark such as the nose or ear, and several close-ups of specific spots. Keep the camera level and perpendicular to the skin so sizes are not distorted.
- Skin preparation: Remove makeup, tinted creams, and heavy SPF at least 30 to 60 minutes beforehand. Avoid strong exfoliation, peels, or tanning for at least 24 hours so your skin looks typical rather than temporarily irritated. Do not apply strong spot treatments right before, as they mask how lesions normally appear.
- Check before sending: Zoom in to confirm sharp focus, and make sure both the affected skin and some surrounding normal skin are visible for comparison.
Upload the photos through our system before your consultation time.
Step 5: Set up your space and device
Choose a quiet, private room where you can speak openly and adjust clothing if needed. Charge and plug in your device, confirm a stable internet connection with a short test call, and position yourself close to both a light source and the camera. Keep your product line-up, medication list, a notepad, and your list of questions within reach.
Step 6: Use your consultation time well
Open with your main concern in one or two sentences. Be honest about what you are realistically willing to change, such as diet, makeup habits, or night-time routines, and what you are not comfortable with, such as certain medications or peels. Ask the questions that shape follow-through: what improvement to expect at 4, 8, and 12 weeks, which side effects are normal and when to reach out, and how to adjust products if your skin becomes too dry or irritated. Before you finish, confirm when your follow-up or photo check-in happens and how to contact us between sessions if you have a flare or reaction.
Step 7: Implement and document afterward
Follow the routine exactly for the first two to four weeks unless you experience strong irritation or the symptoms your specialist warned about. Take progress photos under similar lighting and angles every two to four weeks, and keep a simple log of products used and reactions, diet or hormonal changes, and stressful or sleep-disrupted periods. This documentation is what lets us fine-tune your plan during our bi-weekly follow-ups, especially in the ProAcne Program.
Common mistakes and how to fix them
- Makeup or tinted SPF in photos. These hide redness, pigmentation, and the true color of lesions. Remove all makeup and tinted products well in advance, using only a gentle cleanser and, if needed, a light non-tinted moisturizer.
- Strong treatments right before photos. Recent acids, peels, or intense actives cause temporary redness or peeling that distorts the picture. Pause strong exfoliants and at-home peels 24 to 48 hours before your photo session unless advised otherwise.
- Incomplete history or hidden habits. Under-reporting picking, squeezing, sunbed use, or inconsistent medication leads to a plan that misses your real triggers. Full honesty here directly improves your results.
- Blurry, dark, or over-zoomed photos. These make severity and distribution impossible to judge. Take several images and keep the ones that are sharp, evenly lit, and show some normal surrounding skin.
- Starting new products right before the visit. Fresh breakouts or improvements may be caused by the new product, muddying the assessment. Avoid experimental products in the one to two weeks beforehand, or clearly note when you started and how your skin responded.
- Expecting overnight results. Chronic acne, rosacea, and pigmentation often need 8 to 16 weeks of consistent treatment. Frequent routine changes undermine even a strong plan, which is why structured follow-ups matter.
What you can do yourself, and when you need us
Before the consultation, there is useful groundwork you can safely handle on your own. Switch to a mild, non-stripping cleanser and a broad-spectrum sunscreen suited to your skin type. If you use many actives, simplify to a basic routine of cleanser, moisturizer, and SPF for one to two weeks so your skin shows a clean baseline. Keep a short diary of breakouts, flushing, or itching in relation to diet, stress, cycle, and products, and think honestly about how much dietary and lifestyle change you are willing to commit to.
Structured professional guidance becomes essential when you notice deep, painful nodules or cysts, scarring, or rapidly worsening acne; persistent redness, visible vessels, or burning consistent with rosacea, where our rosacea management consultation is designed to reduce redness and prevent flares; or dark patches that spread or change irregularly. Severe itching, swelling, or blistering after a new product may signal an allergy and needs prompt attention.
One boundary is firm: any systemic symptom, such as fever with a rash, difficulty breathing, or swelling of the tongue or throat, calls for emergency in-person care immediately, followed by specialist skincare guidance. Online care is built to guide you through a safe, structured plan, not to replace emergency or high-risk in-person evaluation.
Frequently Asked Questions
How far in advance should I start preparing?
Ideally three to seven days before your appointment. Use that window to simplify your routine, gather your photos and product lists, and note any patterns in your breakouts or redness.
Can I keep using my current treatments before the consultation?
Continue prescription medications unless your prescriber tells you otherwise, but avoid starting entirely new active products in the week before your visit so your specialist can see your skin's usual state.
Do I need to stop wearing makeup completely?
No. You only need to remove makeup and tinted products for your photos and during the video visit so your bare skin is clearly visible. At other times you can wear makeup as usual.
Can I have the consultation in Russian?
Yes. We support both English and Russian-speaking clients, so you can choose the language in which you feel most comfortable describing your concerns.
Will I ever need an in-person dermatologist after starting online care?
Many cases of acne, rosacea, pigmentation, and sensitive skin can be managed entirely online with high-quality photos and regular follow-ups. If your specialist suspects a condition that requires physical examination, a procedure, or a biopsy, they may recommend an in-person visit.
With your photos taken, your history written down, and your goals clear, you are ready to book a session that starts working from the first appointment rather than the third. When you are set, send us your details and skin photos so Dr. Maria can prepare a plan matched to your skin.